Pages

Showing posts with label FOs. Show all posts

Tuesday, May 13, 2014

Mother's Day Cards

I hope you all had a wonderful Mother's Day! I was invited to a beautiful Mother's day brunch with in-laws and it was fun. It was some Mother's day that we, two generations of moms and all their sons, could all get together to celebrate.

For MIL, I made this card. Mother's day does not seem to complete without flowers, so I wanted to make a card with lots of flowers and cheerful spring-like tones.


For my mother, though, I ditched the flowers and went for the route 66 theme. Until about a year ago we were living in an area that was related to route 66. My mother, who is a fan of route 66, was so excited to visit us there. During her visit, she helped me get through the last couple of weeks of my pregnancy and the first couple of weeks with the new baby, and held her new grandson for the first time. Lots of precious memories. It was indeed a "sentimental journey".

I love that when you make your own card you can really personalize it. Sometimes words fail to express what I want to say but I can still use other medium to convey my messages.

Saturday, March 15, 2014

Baby girl card and Birthday card

I actually made this card a couple of months ago. A good friend of mine from high school had her second baby girl and I included this card in the gift package I sent her. At first I was thinking of a completely different design. I usually draw a very simple draft on a piece of paper to sort out what kind of cards I want to make (which probably is only readable by me haha). My first draft shows that I was thinking of an image where there's laundry hanging under those heart-shaped rain drops.

However, when I was searching for a pattern paper that would fit for this design, these duckies caught my eyes and I couldn't resist! So I scrapped my initial design and this is how it ended up. I even had to change the color scheme. This particular friend loves girly things and her baby is a girl so I wanted to use pink or red. But neither of the colors didn't look cute with these duckies so I chose this lime green paper as a background. 

I love the planning stage of my card making process, but sometimes it's nice to see a surprise result, especially if it is cute like this. 
I used this Friskars cloud squeeze punch for the clouds. I love this punch. It's so versatile. I actually used it to make my valentine's card I wrote about the other day too. "X-Large" is a bit misleading imho, though.

The second card I show you today is a birthday card.
I definitely wanted to use flower prints for this card. Among a few I had, I picked this one because I liked its vintage and feminine feeling. I paired dark brown card stock with it and finished with the mint color band and pearly stickers. I love the light blue/mint and brown color combo.

Thursday, January 23, 2014

Kimono Sweater Finished!

Having cast on in early November last year, I finally finished LO's baby sachiko kimono sweater. I started to get worried that I wouldn't be able to finish before the winter ends, so I made this project my priority. I'm so glad I finished it because 1) LO wouldn't be able to fit into this next year and 2) this winter is super extra cold!!

Instead of making the ties with yarn, I used a bias tape. I used a 1/2" wide bias tape, made two 10.5" long ones, sewn the open side and attached to the bottom of the slants. I'm not a fan of the look of knitted/crocheted ties. Fabric ones look cleaner and neater, imho.

Having said that, I used crochet ties inside of the sweater. I found that the bias tape tie would've been too bulky.
Rather than leaving the sides open as in the original pattern, I sewn the seams as you can see from the above photo. I love the sweater. It looks warm and comfy. And I think it looks great on Little Guy too :)
(yeah. Modern babies know how to use apps already)

Details
Yarn used: Lion Brand Cotton-Ease, Lime & Almond
Needles: 5mm
Gauge 4 sts per inch
Size modification
I wanted to make this a 24 month old size but the pattern goes only up to 18 month, so I made the following modification.
Cast on 52 stitches. For the front, started to decrease when the piece measures 5" to 18 sts. The total length is 11.5". In retrospect, I might have wanted to make it half an inch longer.
I made the sleeves as the 18 month old size, except I added 2 rows at the beginning.

Right now he's only 14 month old, who was as tall as 18 month old at the 12 month checkup. So I'm not perfectly sure if this measurements will fit actual 24 month old children but it looks just the right size for him - not too big but seems to last till spring.

Monday, December 23, 2013

Christmas Cards

I usually knit or crochet Christmas gifts but with limited time this year no hand-knitted/crocheted items were on my list. This is a bit of a disappointment but a huge relief at the same time. Last year I was panicked that I wouldn't be able to finish these dolls for my nieces!

I could, however, sneak in some time to make these cards.
This was sent for my parents. I love the "Christmas Greetings" stamp, which came from this set that was a freebie from the magazine Cardmaking & Papercraft.
I fell in love with these stamps, especially its vintage feelings. I pretty much bought this issue to get these stamps.

But on flipping through the magazine I found a few interesting layouts. One of them was this design that uses buttons as a Christmas wreath, which is the inspiration of this card for my in-laws.
Inside the wreath I used one of the postage stamps stamp from the set. Too bad I smudged it. Ooops. The original design was very simple with just the button wreath on a kraft card and I liked its simplicity. But mine looked a bit too simple, so I stamped those snowflakes in silver and placed those little gingerbread men on the bottom.

There was a snowman printed on a part of the patterned paper I used above, and I really wanted to incorporate him on one of the cards above. But I couldn't come up with a way to do that. So I just made a separate card featuring him.
Like the second card, I stamped a couple of snowflakes in silver, and placed a few pearly stickers. I think I could show the feeling of a snowy "let's make a snowman" kind of day with this card. This was sent to my brother-in-law and his lovely daughters.

Did you make or receive handmade Christmas cards?

Friday, December 13, 2013

Anniversary Card

November is a pretty busy month for us. Not only do we have Thanksgiving and the start of the holiday season, we also have little guy's birthday and our anniversary, all within 1-2 weeks!

This year we celebrated our eighth year anniversary (and it's the 10th since we met. wow). Because we were going to go to the in-laws' for Thanksgiving we decided to have a special anniversary dinner at our favorite Italian restaurant in that area while my in-laws watched the little one. It indeed was a wonderful dinner and I'm thankful for my parents-in-law. I don't use non-family sitters so going out alone with hubby is really a rare occasion for us right now - not that I mind, I love going out with LO.

This is the card I made for hubby. I drew inspirations from two kinds of cards I saw in a book, one of which uses the "(how many) reasons why I love you theme (I think it was 23 or 25 or something in the original design. that's gotta be awesome!). But I also liked the window panel design I found in another card, so I combined the two.
Inside I printed out this quote from Antoine de Saint-Exupery (who wrote the little prince).
We've been going through life's major changes in the past few years, which seem to continue into the next few, so I thought this quote sounds right for us. We are not where we thought we'd be but at least we're heading for the same direction together. Rather than getting frustrated about what we don't have or what we haven't achieved I remind ourselves that we should enjoy our life adventures together.
I hand-stamped each letter using these stamps. That was a bit tedious task but I love how this card came out. Hubby looked impressed too :) Since I didn't have numbers stamps I hand-wrote "8" but in retrospect I should've spelled out 8 and used the stamps as well. That would've made the sentiments look neater.

Sunday, November 10, 2013

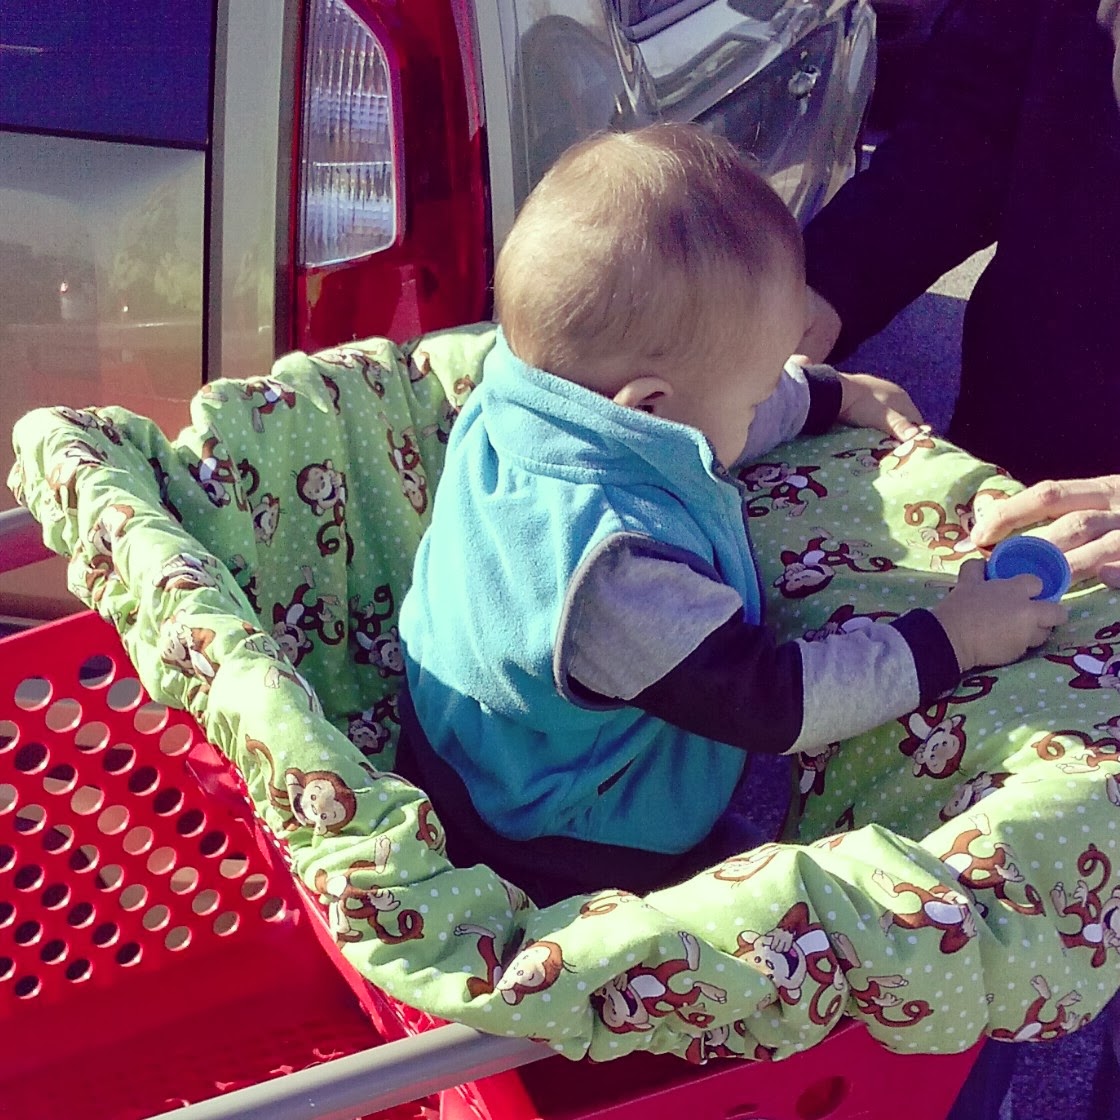
FO: Shopping Cart Seat Cover

I've finished it! yay. This cart seat cover is indeed cute and I received a few admiring looks from other mamas during our shopping trip. I made a few mistakes in it but feel a bit proud :)

The pattern is A Universal Shopping Cart Cover from lil blue boo (free! thanks Ashley). It was a little pain to add patches of fabric to make it wider before diving into actual sewing but the end product is definitely worth it. I'd wanted use 60" wide fabric to minimize the preparation time but I couldn't find cute patterns. It doesn't show in the photo but the back side is simple dark brown fabric. If anything, I wish there were a slit or something where the handle is so I can have a firmer grip on the handle. Also because the cover pushes the belt down, it becomes too short, especially for my son who's tall for his age (Perhaps this would be a problem for him with or without the cover anyway). I might need to carry a separate belt for him.

But I LOVE this cover!

It's a bit embarrassing to admit my mistakes but these were what I did wrong.

1) I don't know what I was thinking but somehow I ended up with 4 leg openings (ugh) so I had to patch those up with leftover fabric (which happened to be where he sits so luckily it won't show when in use).

2) I'm still not good at attaching bias tapes. I'm not a fan of them. I didn't cut long enough bias tapes and had to connect a couple of them for one opening :( The stitching is not neat. Guess I need more practicing.

But I still like it. Actually, I like it maybe because of these mistakes. These mistakes show that I put my efforts in making something for my little guy. This is why handmade items are unique.

With extra padding, Jr. can now sit in the cart a little more comfortably. Moreover, since he doesn't touch the cart itself, he's not going to collect germs from the cart!

Friday, November 1, 2013

Jr's First Trick-Or-Treating

I hope you all had a fun Halloween, if you celebrate! It was Jr's first Halloween and he was oh so cute in his costume. Husband and I, both being fans of making things, wanted to make his costume too but we were just so busy during the month of October that we couldn't manage it. Instead, we just picked up a Superman costume at a party store. But that's ok cause he was freaking cute :)

I realized that we didn't have a container to collect Halloween candy so I whipped up this little paper bag on the day of Halloween.
I used 12 x 12 pattern paper and stamped those bats and the "Happy Halloween" phrase (the stamps are from the Halloween and Thanksgiving stamp set from Stampabilities). I love this font! The bag wouldn't be big enough for a typical trick-or-treating but since he was only a baby I figured this would be big enough for this year.

Unfortunately, the total amount of candy was so heavy that the bag fell apart at the end :( Well, that may be good news, I guess.

Monday, October 21, 2013

Birthday Card #1

I made this card for my FIL, who recently had his birthday. The card was inspired by the cards "Pastel Phrases" in the book the ultimate paper crafts collection. As a center piece, my final choices were this lighthouse one and a golf themed sticker (he loves playing golf) but I chose the lighthouse. The piece seemed to match with the background pattern and the overall color scheme better. And I thought the ocean and the lighthouse would be perfect because they recently had a trip to the Mediterranean region.

Tuesday, July 16, 2013

Cards #1

I've made these to hone my card making skills. I borrowed a bunch of card making or papercraft books from my local library and made some that interested me. There are so many ideas and inspirations! I'm so happy I've finally decided to dive into this craft.

Here are a few of them:

I know - some lines are not very straight. practice. practice.
Made to learn layering.
Learned to use vellum paper and to layer cards with a string rather than glue.

These were just practice pieces and not so much of my style. But for the next two, I was able to show more of my tastes.

Made to practice a little peeking window in the front of the card. When it opens,
This card is for my husband's relatives who kindly gave us some baby gifts.

The next one is my favorite of all the cards I've made so far.
For a friend of mine who's having a baby soon.
I thought using black in a welcome baby card was uncommon but would make a cute and chic card, and I wasn't wrong. I learned to use buttons, ribbons and layered pieces of paper in this card - so fun! I hope she likes it.

I found that when I have a recipient (or at least a real occasion) in mind, the cards turn out to be more of my style, even for practice pieces. And it's way more fun!

The designs of these cards were inspired by the book I love card making: 25 projects that will show you how to make cards easily and quickly by Amy Gooda. It was a great introductory book to card mking. Not overwhelming but covers a wide variety of skills and ideas.

Monday, June 10, 2013

What I made for LO so far

Here are some of the things I made for my LO while pregnant (which I finally get around to post). In no particular order...

Playful Baby Loop Rattle


 Cowboy Boot-ies

I added this star mark for fun (per hubby's suggestion)
Isn't this cute on him? Unfortunately, though, they were difficult to put on because the ankle sections were a bit small. Oh well, they're really cute just to look at. Totally worth making them. I'd like to make a size that fits him now and a matching cowboy hat.
b19-31 Jacket with raglan sleeves, hat, and booties with cables
sleeves in making. Look how small they are!

These are in 3 month old size. However, since LO was advised not to go outside for the first two months (it was a flu season), there weren't many chances he needed a sweater like this. I should've made them in 6 month old size. I still love them though :)

Berry Baby Hat

I wanted to make this hat even before I was pregnant! So it was definitely on my to-make list. I chose purplish blue to make it like a blueberry but everyone says it's an eggplant hat LOL

oh well....

Stripes and Dots Blanket
There aren't many projects that I chose the exact (or almost exact) colors that the pattern calls for, but these colors are just so perfect I just used the colors in the pattern. And I love it!

I actually had a lot more projects in my queue. But because 1) I had no idea what the baby would use and 2) I was sick for the first couple of months and then was really tired for the last few weeks, I couldn't make as much as I wanted. Babies grow so fast. A few projects I wanted to make wouldn't fit in terms of size and needs anymore, which is too bad. Especially my LO is a tall baby - he's already as tall as an average 9 month old baby at the age of 6 months! But there are a lot of cute patterns for a year old and up. I look forward to make those in the near future :)